
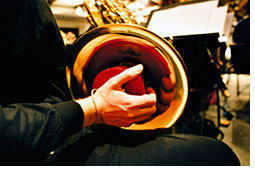
How can musicians protect their hearing?
According to a 2002 research study survey on musicians and hearing loss conducted by H.E.A.R. with Smith-Kettlewell Institute researchers, it was estimated that 86% of musicians and concert goers surveyed over a 10-year period reported ringing in the ears after going to hear loud music. Read this blog article to find out about hearing protection for musicians.
Findings of a European study of over seven million health records from 2004 to 2008 showed that working musicians topped the charts for hearing loss.
The good news is that hearing loss is preventable. The risk of damaging your hearing depends on a number of factors including:
- the intensity of the sounds and/or the loudness of the music or noise
- how close you are to the loud sound source
- how long you are exposed to loud music or noise
- other noisy activity exposure that day, including how loudly you listen to your music
- previous hearing damage
- your health condition at the time (alcohol and dehydration make things worse)
- family history of hearing loss
- drugs that may be ototoxic (toxic to the ears)
Are you at risk?
The incidence of hearing loss in classical musicians has been estimated at 4-43%. In rock musicians, this figure is 13-30%. High frequency sounds of 2-4,000 Hz are the most damaging. For reference, the highest octave of the piccolo registers 2,048-4,096 Hz.
Regular sustained exposure may cause permanent damage at 90-95 dB. Physical pain can begin at 125 dB. Everyday environmental noise, including conversation, telephone dial tones, city traffic, tube trains, and power tools ranges from 60-125 dB. Musical noise, including the volume of individual instruments, ranges from 60-150 dB. Jet engines at 100 feet register 140-150 dB.
Hearing protection – what can you do to minimise the potential for hearing loss and prevent further damage?
It is important to not overexpose your ears. This can be done by:
1) turning down the volume of your stereo, TV and MP3 music device
2) monitoring sound levels at your rehearsals and performances
3) limiting your exposure time to loud noises
4) taking a 5 to 15 minute break from the sound source
5) wearing earplugs!
As sunglasses are for protection of the eyes, hearing protection in loud, noisy environments is just as important for the ears. Every working musician, music industry professional, and music listener should consider using hearing protection.
Today, sales of custom-fitted in-ear monitors (CIEM) have grown exponentially, benefiting touring musicians; club and dance bands; DJs; sound, monitor and FOH engineers; musical theatre orchestras; symphony and opera orchestras; church bands; audiophiles; and the general public. The pro sound market for CIEMs is reported to be 30 percent of audiology clientele and growing fast.
There are many excellent pro companies supplying in-ear systems with drivers that appeal to nearly anyone’s taste or budget. “Universal-fit” IEMs supplied with a variety of ear tip styles and sizes are often a good way for musicians to “test the waters” using in-ear devices, but to best achieve isolation and eliminate sound leakage, custom fitted systems are the way to go.
Hearing protection – the customised approach
Once you’ve found a driver to your liking, the next step is having a custom-fitted ear mould made. The process requires going to a hearing specialist who is experienced in making custom in-ear music products. The importance of making an accurate ear impression is an essential factor in the formula for making the best possible CIEM earpiece.
Crafting ear impressions is like making a three-dimensional sculpture of the inside of your ears. Precise measurements and the knowledge of the interior dimensions of your ear is key. Hearing professionals such as audiologists have the tools and know-how to take accurate impressions.
Creating the ear moulds
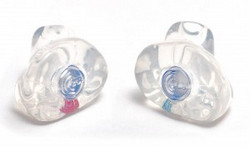
Once your impressions are made, these are sent to the laboratory to be scanned and created on a computer. The acrylic solution is poured and begins to harden in an investment cast made from your impressions. The ear mould canal insides are hollowed out by hand, which tunes it to about a 3 dB resonance of the natural ear canal. The CIEM driver and monitor cable socket are also set up and inserted, and other fine adjustments and cosmetic designs are made during the lab process.
An overall fit that is too loose results in a compromised seal, and sound bleeds through the gaps and may reduce the sound quality of the monitor. In order to have more of a full bass response, you need to have a tight seal. Fit and comfort directly correlate to how good your monitors will sound. The better the fit, the better the feel and sound. In-ear monitors need to block -26 dB of ambient noise and fit snugly.
It’s crucial that you feel confident and comfortable with your choice of an ear impressionist. Call around. Find an audiologist who is music savvy and has made impressions for in-ear monitors before.
Five steps toward making a great impression

1. Set up an appointment with your local audiologist/ ear impressionist.
2. A small ear dam made of cotton or soft foam is placed just past the second bend of your ear canal to protect your eardrum and serve as a backstop for the impression material.
3. A bite-block will be provided to allow an open mouth impression to be taken. It helps to keep your jaw open in a relaxed position, producing a more comfortable, natural-fitting custom in-ear monitor.
4. A two-part epoxy designed for medical use is mixed and put into a specially designed syringe. Some ear impressionists use an ear gun syringe that holds a two-part mixture. The impression mixture is semi-viscous and it looks like Silly Putty. It’s then injected into your ear, a feeling much like putting your toes in mud. The impression material goes right up to the ear dam and fills up the in-ear canal completely.
5. Silicon impression material usually hardens in about one minute, but sometimes impression material can take up to five minutes to harden. After the ear moulds harden and set up, they are taken out of the ear.
This is where uniformity and balance is checked. A good ear impressionist will know if it is not the proper fit and will make a new impression over in order to check and compare if need be. If it’s not right, it should be made again.
In Ear Monitor (IEM) and Custom In Ear Monitors (CIEM) tips:
1. Use your IEMs for everything – with your MP3 player, computer, in the studio, etc. – and get used to taking them in/out until it becomes second nature. If there is any discomfort at all, contact your hearing health professional or IEM provider.
2. You want to be sure what you are hearing is accurate and reflects what you will be doing on stage. The idea is not to hear so well that you sing off the mic. You must be able to work the mic properly and dynamically and be able to be close without an issue and a bit off the mic when you push. The house mixer (and fans) will not be happy if you hear too well and sing too far off the mic.
3. It is not proper to have the sound seem like it is directly in your ears or head. It is very important to add a little reverb so it sounds like you are singing in the room naturally and out to the audience. This will also allow you to keep the volume in your ears at a lower level and in balance with the rest of the band. It will also help you to perform for longer periods of time without vocal and hearing fatigue.
4. Always start with vocal sound first when sound checking on the stage. The mix should be built around a comfortable vocal level.
5. Never just pull or tug your In Ear Monitors out by the cord. Twist your IEMs out properly to avoid damaging them.
Hearing protection – where to find out more
Find out about our solutions for hearing protection.
Related Posts
Marlow FM Hearing Health Hour 16/04/2024
As some of you will know, we have started an exciting new venture alongside MarlowFM…
Marlow FM Hearing Health Hour 19/03/2024
As some of you will know, we have started an exciting new venture alongside MarlowFM…
Marlow FM Hearing Health Hour 13/02/2024
As some of you will know, we have started an exciting new venture alongside MarlowFM…
This Post Has 0 Comments